mirror of
https://github.com/langgenius/dify-docs.git
synced 2026-07-22 12:25:45 -04:00
 Alter-xyz
293 lines
14 KiB
Plaintext
293 lines
14 KiB
Plaintext
---
|
|
dimensions:
|
|
type:
|
|
primary: implementation
|
|
detail: high
|
|
level: beginner
|
|
standard_title: Extension Plugin
|
|
language: ja
|
|
title: Extension 插件
|
|
description: 本文档提供了开发Extension类型插件的完整教程,详细介绍了环境准备、创建项目、定义插件请求入口、编写功能代码、调试、打包发布等全过程。示例项目是一个彩虹猫插件,展示了如何通过Extension插件处理HTTP请求并提供网页服务。
|
|
---
|
|
|
|
本文将引导你快速开发一个 Extension 类型的插件,以帮助你了解插件开发的基础流程。
|
|
|
|
### 前置准备
|
|
|
|
* Dify 插件脚手架工具
|
|
* Python 环境,版本号 ≥ 3.12
|
|
|
|
关于如何准备插件开发的脚手架工具,详细说明请参考[初始化开发工具](initialize-development-tools.md)。
|
|
|
|
### 创建新项目
|
|
|
|
在当前路径下,运行脚手架命令行工具,创建一个新的 dify 插件项目。
|
|
|
|
```
|
|
./dify-plugin-darwin-arm64 plugin init
|
|
```
|
|
|
|
如果你已将该二进制文件重命名为了 `dify` 并拷贝到了 `/usr/local/bin` 路径下,可以运行以下命令创建新的插件项目:
|
|
|
|
```bash
|
|
dify plugin init
|
|
```
|
|
|
|
#### 1. 填写插件信息
|
|
|
|
按照提示配置插件名称、作者信息与插件描述。如果你是团队协作,也可以将作者填写为组织名。
|
|
|
|
> 插件名称长度必须为 1-128 个字符,并且只能包含字母、数字、破折号和下划线。
|
|
|
|

|
|
|
|
填写完成后,在插件开发语言环节中选择 Python。
|
|
|
|

|
|
|
|
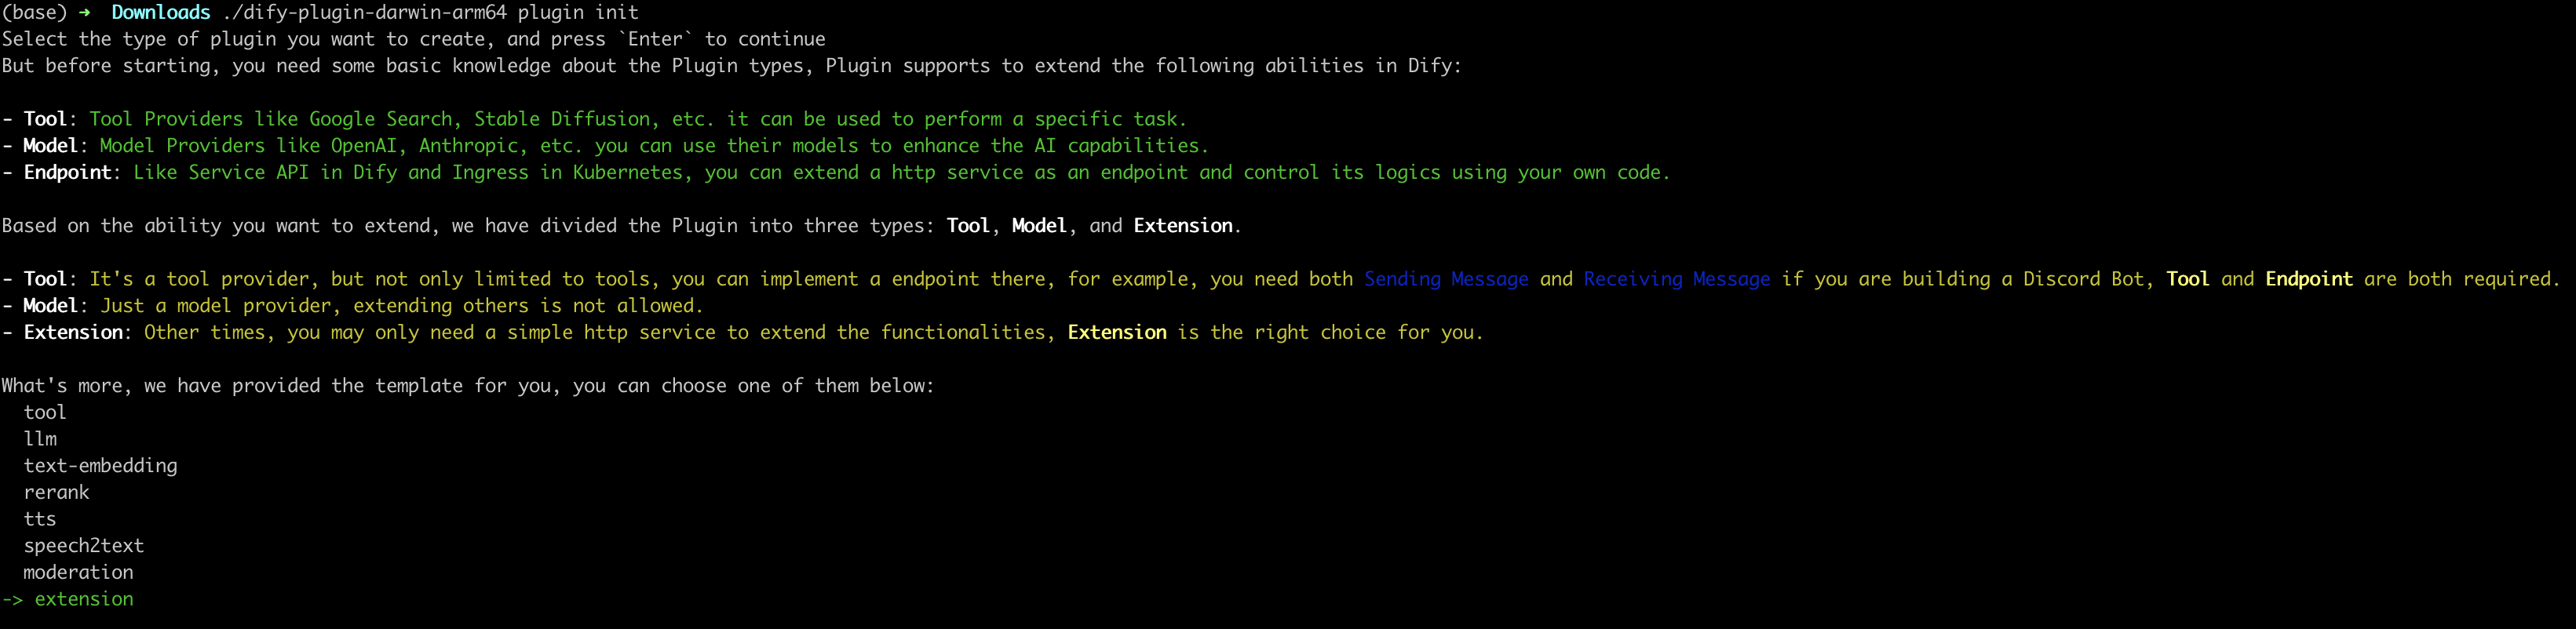
#### 2. 选择插件类型并初始化项目模板
|
|
|
|
脚手架工具内的所有模板均已提供完整的代码项目。出于演示说明,本文将以 `Extension` 类型插件模板作为示例。对于已熟悉插件的开发者而言,无需借助模板,可参考[接口文档](../../schema-definition/)指引完成不同类型的插件开发。
|
|
|
|
|
|
|
|
#### 3. 配置插件权限
|
|
|
|
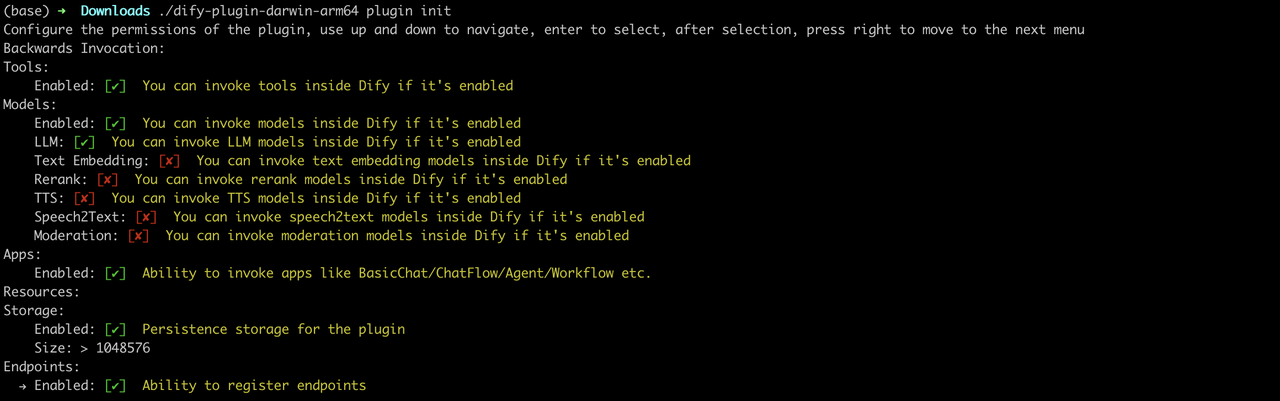
插件还需要读取 Dify 主平台的权限才能正常连接。需要为该示例插件授予以下权限:
|
|
|
|
* Tools
|
|
* LLMs
|
|
* Apps
|
|
* 启用持久化存储 Storage,分配默认大小存储
|
|
* 允许注册 Endpoint
|
|
|
|
> 在终端内使用方向键选择权限,使用 “Tab” 按钮授予权限。
|
|
|
|
勾选所有权限项后,轻点回车完成插件的创建。系统将自动生成插件项目代码。
|
|
|
|
|
|
|
|
插件的基础文件结构包含以下内容:
|
|
|
|
```
|
|
.
|
|
├── GUIDE.md
|
|
├── README.md
|
|
├── _assets
|
|
│ └── icon.svg
|
|
├── endpoints
|
|
│ ├── your-project.py
|
|
│ └── your-project.yaml
|
|
├── group
|
|
│ └── your-project.yaml
|
|
├── main.py
|
|
├── manifest.yaml
|
|
└── requirements.txt
|
|
```
|
|
|
|
* `GUIDE.md` 一个简短的引导教程,带领你完成插件的编写流程。
|
|
* `README.md` 关于当前插件的简介信息,你需要把有关该插件的介绍和使用方法填写至该文件内。
|
|
* `_assets` 存储所有与当前插件相关的多媒体文件。
|
|
* `endpoints` 按照 cli 中的引导创建的一个 `Extension` 类型插件模板,该目录存放所有 Endpoint 的功能实现代码。
|
|
* `group` 指定密钥类型、多语言设置以及 API 定义的文件路径。
|
|
* `main.py` 整个项目的入口文件。
|
|
* `manifest.yaml` 整个插件的基础配置文件,包含该插件需要什么权限、是什么类型的扩展等配置信息。
|
|
* `requirements.txt` 存放 Python 环境的依赖项。
|
|
|
|
### 开发插件
|
|
|
|
#### 1. 定义插件的请求入口 Endpoint
|
|
|
|
编辑 `endpoints/test_plugin.yaml` ,参考以下代码进行修改:
|
|
|
|
```yaml
|
|
path: "/neko"
|
|
method: "GET"
|
|
extra:
|
|
python:
|
|
source: "endpoints/test_plugin.py"
|
|
```
|
|
|
|
该代码的意图是定义该插件的入口路径为 `/neko`,请求方法为 GET 类型。插件的功能实现代码为 `endpoints/test_plugin.py` 文件。
|
|
|
|
#### 2. 编写插件功能
|
|
|
|
插件功能:请求服务,输出一只彩虹猫。
|
|
|
|
编写插件的功能实现代码 `endpoints/test_plugin.py` 文件,参考以下示例代码:
|
|
|
|
```python
|
|
from typing import Mapping
|
|
from werkzeug import Request, Response
|
|
from flask import Flask, render_template_string
|
|
from dify_plugin import Endpoint
|
|
|
|
app = Flask(__name__)
|
|
|
|
class NekoEndpoint(Endpoint):
|
|
def _invoke(self, r: Request, values: Mapping, settings: Mapping) -> Response:
|
|
ascii_art = '''
|
|
⬜️⬜️⬜️⬜️⬜️⬜️⬜️⬜️⬜️⬜️⬜️⬜️⬜️⬜️⬜️⬜️⬜️⬜️⬜️⬜️⬜️⬜️⬜️⬜️⬜️⬜️⬜️⬛️⬛️⬛️⬛️⬛️⬛️⬛️⬛️⬛️⬛️⬛️⬛️⬛️⬛️⬛️⬛⬛️⬜️⬜️⬜️⬜️⬜⬜️⬜️️
|
|
🟥🟥⬜️⬜️⬜️⬜️⬜️⬜️⬜️⬜️🟥🟥🟥🟥🟥🟥🟥🟥⬜️⬜️⬜️⬜️⬜️⬜️⬜️⬜️⬛🥧🥧🥧🥧🥧🥧🥧🥧🥧🥧🥧🥧🥧🥧🥧🥧🥧⬛️⬜️⬜️⬜️⬜️⬜⬜️️
|
|
🟥🟥🟥🟥🟥🟥🟥🟥🟥🟥🟥🟥🟥🟥🟥🟥🟥🟥🟥🟥🟥🟥🟥🟥🟥⬛️🥧🥧🥧💟💟💟💟💟💟💟💟💟💟💟💟💟🥧🥧🥧⬛️⬜️⬜️⬜️⬜⬜️️
|
|
🟥🟥🟥🟥🟥🟥🟥🟥🟥🟥🟥🟥🟥🟥🟥🟥🟥🟥🟥🟥🟥🟥🟥🟥🟥⬛️🥧🥧💟💟💟💟💟💟🍓💟💟🍓💟💟💟💟💟🥧🥧⬛️⬜️⬜️⬜️⬜️⬜️️
|
|
🟧🟧🟥🟥🟥🟥🟥🟥🟥🟥🟧🟧🟧🟧🟧🟧🟧🟧🟥🟥🟥🟥🟥🟥🟥⬛🥧💟💟🍓💟💟💟💟💟💟💟💟💟💟💟💟💟💟🥧⬛️⬜️⬜️⬜️⬜⬜️️
|
|
🟧🟧🟧🟧🟧🟧🟧🟧🟧🟧🟧🟧🟧🟧🟧🟧🟧🟧🟧🟧🟧🟧🟧🟧🟧⬛️🥧💟💟💟💟💟💟💟💟💟💟⬛️⬛️💟💟🍓💟💟🥧⬛️⬜️⬛️️⬛️️⬜⬜️️
|
|
🟧🟧🟧🟧🟧🟧🟧🟧🟧🟧🟧🟧🟧🟧🟧🟧🟧🟧🟧🟧🟧🟧🟧🟧🟧⬛️🥧💟💟💟💟💟💟💟💟💟⬛️🌫🌫⬛💟💟💟💟🥧⬛️⬛️🌫🌫⬛⬜️️
|
|
🟨🟨🟧🟧🟧🟧🟧🟧🟧🟧🟨🟨🟨🟨🟨🟨🟨🟨🟧⬛️⬛️⬛️⬛️🟧🟧⬛️🥧💟💟💟💟💟💟🍓💟💟⬛️🌫🌫🌫⬛💟💟💟🥧⬛️🌫🌫🌫⬛⬜️️
|
|
🟨🟨🟨🟨🟨🟨🟨🟨🟨🟨🟨🟨🟨🟨🟨🟨🟨🟨🟨⬛️🌫🌫⬛️⬛️🟧⬛️🥧💟💟💟💟💟💟💟💟💟⬛️🌫🌫🌫🌫⬛️⬛️⬛️⬛️🌫🌫🌫🌫⬛⬜️️
|
|
🟨🟨🟨🟨🟨🟨🟨🟨🟨🟨🟨🟨🟨🟨🟨🟨🟨🟨🟨⬛️⬛️🌫🌫⬛️⬛️⬛️🥧💟💟💟🍓💟💟💟💟💟⬛️🌫🌫🌫🌫🌫🌫🌫🌫🌫🌫🌫🌫⬛⬜️️
|
|
🟩🟩🟨🟨🟨🟨🟨🟨🟨🟨🟩🟩🟩🟩🟩🟩🟩🟩🟨🟨⬛⬛️🌫🌫⬛️⬛️🥧💟💟💟💟💟💟💟🍓⬛️🌫🌫🌫🌫🌫🌫🌫🌫🌫🌫🌫🌫🌫🌫⬛️
|
|
🟩🟩🟩🟩🟩🟩🟩🟩🟩🟩🟩🟩🟩🟩🟩🟩🟩🟩🟩🟩🟩⬛️⬛️🌫🌫⬛️🥧💟🍓💟💟💟💟💟💟⬛️🌫🌫🌫⬜️⬛️🌫🌫🌫🌫🌫⬜️⬛️🌫🌫⬛️
|
|
️🟩🟩🟩🟩🟩🟩🟩🟩🟩🟩🟩🟩🟩🟩🟩🟩🟩🟩🟩🟩🟩🟩⬛️⬛️⬛️⬛️🥧💟💟💟💟💟💟💟💟⬛️🌫🌫🌫⬛️⬛️🌫🌫🌫⬛️🌫⬛️⬛️🌫🌫⬛️
|
|
🟦🟦🟩🟩🟩🟩🟩🟩🟩🟩🟦🟦🟦🟦🟦🟦🟦🟦🟩🟩🟩🟩🟩🟩⬛️⬛️🥧💟💟💟💟💟🍓💟💟⬛🌫🟥🟥🌫🌫🌫🌫🌫🌫🌫🌫🌫🟥🟥⬛️
|
|
🟦🟦🟦🟦🟦🟦🟦🟦🟦🟦🟦🟦🟦🟦🟦🟦🟦🟦🟦🟦🟦🟦🟦🟦🟦⬛️🥧🥧💟🍓💟💟💟💟💟⬛️🌫🟥🟥🌫⬛️🌫🌫⬛️🌫🌫⬛️🌫🟥🟥⬛️
|
|
🟦🟦🟦🟦🟦🟦🟦🟦🟦🟦🟦🟦🟦🟦🟦🟦🟦🟦🟦🟦🟦🟦🟦🟦🟦⬛️🥧🥧🥧💟💟💟💟💟💟💟⬛️🌫🌫🌫⬛️⬛️⬛️⬛️⬛️⬛️⬛️🌫🌫⬛️⬜️
|
|
🟪🟪🟦🟦🟦🟦🟦🟦🟦🟦🟪🟪🟪🟪🟪🟪🟪🟪🟦🟦🟦🟦🟦🟦⬛️⬛️⬛️🥧🥧🥧🥧🥧🥧🥧🥧🥧🥧⬛️🌫🌫🌫🌫🌫🌫🌫🌫🌫🌫⬛️⬜️⬜️
|
|
🟪🟪🟪🟪🟪🟪🟪🟪🟪🟪🟪🟪🟪🟪🟪🟪🟪🟪🟪🟪🟪🟪🟪⬛️🌫🌫🌫⬛️⬛️⬛️⬛️⬛️⬛️⬛️⬛️⬛️⬛️⬛️⬛️⬛️⬛️⬛️⬛️⬛️⬛️⬛️⬛️⬛️⬜️⬜️⬜️
|
|
🟪🟪🟪🟪🟪🟪🟪🟪🟪🟪🟪🟪🟪🟪🟪🟪🟪🟪🟪🟪🟪🟪🟪⬛️🌫🌫⬛️⬛️⬜️⬛️🌫🌫⬛️⬜️⬜️⬜️⬜️⬜️⬛️🌫🌫⬛️⬜️⬛️🌫🌫⬛️⬜️⬜️⬜️⬜️
|
|
⬜️⬜️🟪🟪🟪🟪🟪🟪🟪🟪⬜️⬜️⬜️⬜️⬜️⬜️⬜️⬜️🟪🟪🟪🟪🟪⬛️⬛️⬛️⬛⬜️⬜️⬛️⬛️⬛️⬜️⬜️⬜️⬜️⬜️⬜️⬜️⬛️⬛️⬛️⬜️⬜️⬛️⬛️⬜️⬜️⬜️⬜️⬜️️
|
|
'''
|
|
ascii_art_lines = ascii_art.strip().split('\n')
|
|
with app.app_context():
|
|
return Response(render_template_string('''
|
|
<!DOCTYPE html>
|
|
<html>
|
|
<head>
|
|
<style>
|
|
body {
|
|
background-color: black;
|
|
color: white;
|
|
overflow: hidden;
|
|
margin: 0;
|
|
padding: 0;
|
|
}
|
|
#ascii-art {
|
|
font-family: monospace;
|
|
white-space: pre;
|
|
position: absolute;
|
|
top: 50%;
|
|
transform: translateY(-50%);
|
|
display: inline-block;
|
|
font-size: 16px;
|
|
line-height: 1;
|
|
}
|
|
</style>
|
|
</head>
|
|
<body>
|
|
<div id="ascii-art"></div>
|
|
<script>
|
|
var asciiArtLines = {{ ascii_art_lines | tojson }};
|
|
var asciiArtDiv = document.getElementById("ascii-art");
|
|
var index = 0;
|
|
function displayNextLine() {
|
|
if (index < asciiArtLines.length) {
|
|
var line = asciiArtLines[index];
|
|
var lineElement = document.createElement("div");
|
|
lineElement.innerHTML = line;
|
|
asciiArtDiv.appendChild(lineElement);
|
|
index++;
|
|
setTimeout(displayNextLine, 100);
|
|
} else {
|
|
animateCat();
|
|
}
|
|
}
|
|
function animateCat() {
|
|
var pos = 0;
|
|
var screenWidth = window.innerWidth;
|
|
var catWidth = asciiArtDiv.offsetWidth;
|
|
function move() {
|
|
asciiArtDiv.style.left = pos + "px";
|
|
pos += 2;
|
|
if (pos > screenWidth) {
|
|
pos = -catWidth;
|
|
}
|
|
requestAnimationFrame(move);
|
|
}
|
|
move();
|
|
}
|
|
displayNextLine();
|
|
</script>
|
|
</body>
|
|
</html>
|
|
''', ascii_art_lines=ascii_art_lines), status=200, content_type="text/html")
|
|
```
|
|
|
|
运行此代码需要先安装以下 Python 依赖包:
|
|
|
|
```python
|
|
pip install werkzeug
|
|
pip install flask
|
|
pip install dify-plugin
|
|
```
|
|
|
|
### 调试插件
|
|
|
|
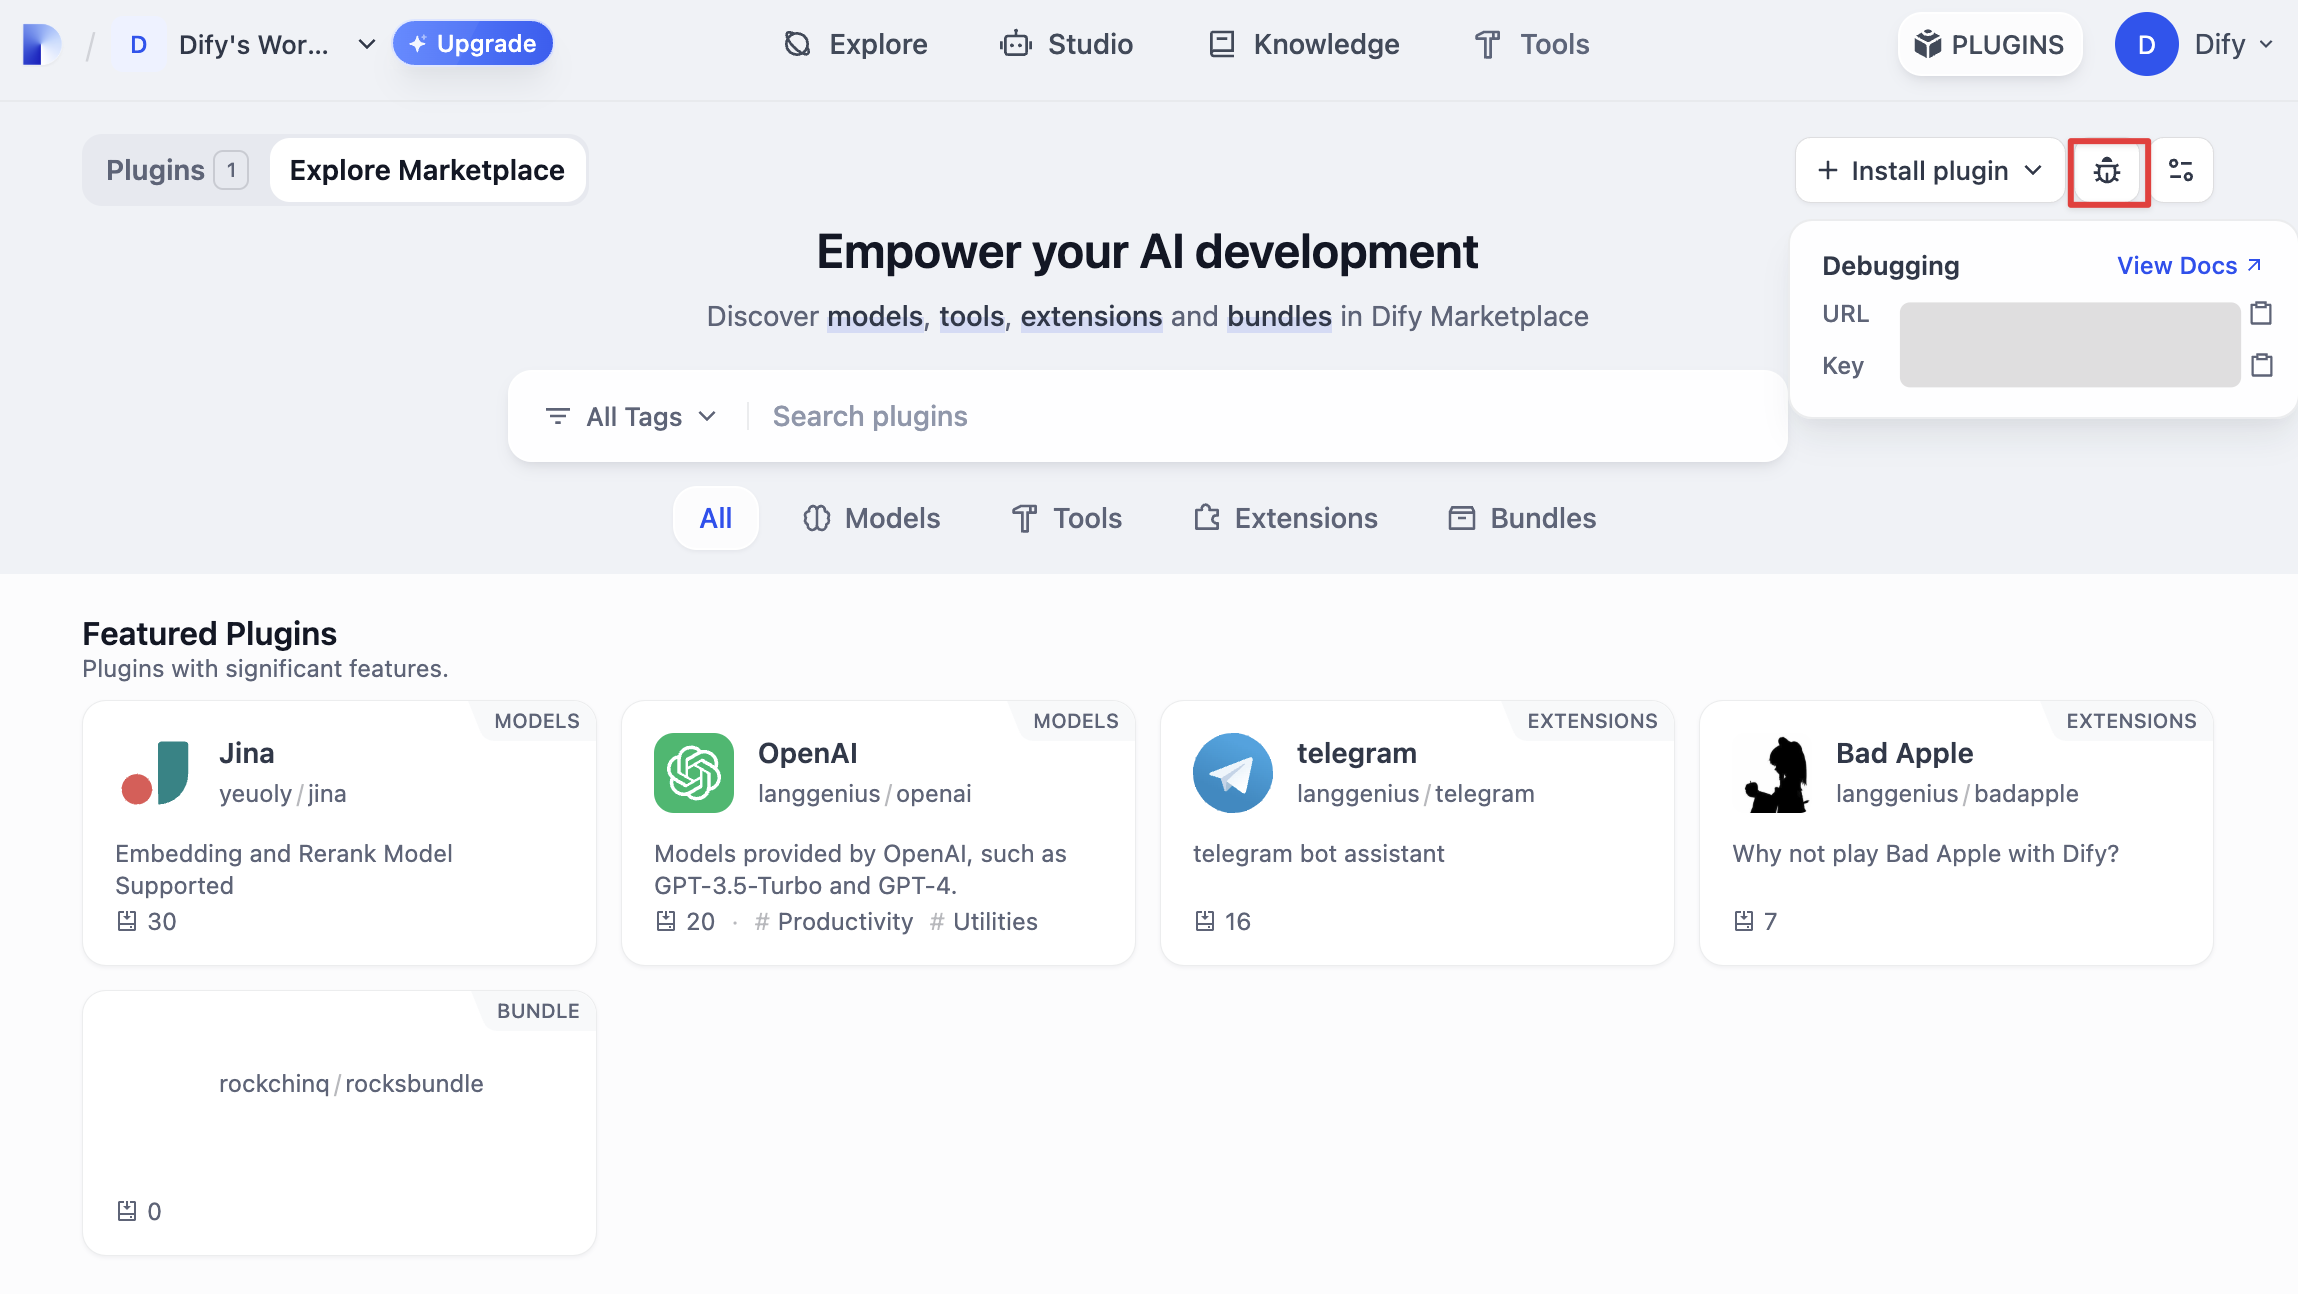
接下来需测试插件是否可以正常运行。Dify 提供远程调试方式,前往“插件管理”页获取调试 Key 和远程服务器地址。
|
|
|
|
|
|
|
|
回到插件项目,拷贝 `.env.example` 文件并重命名为 `.env`,将获取的远程服务器地址和调试 Key 等信息填入其中。
|
|
|
|
`.env` 文件
|
|
|
|
```bash
|
|
INSTALL_METHOD=remote
|
|
REMOTE_INSTALL_URL=debug.dify.ai:5003
|
|
REMOTE_INSTALL_KEY=********-****-****-****-************
|
|
```
|
|
|
|
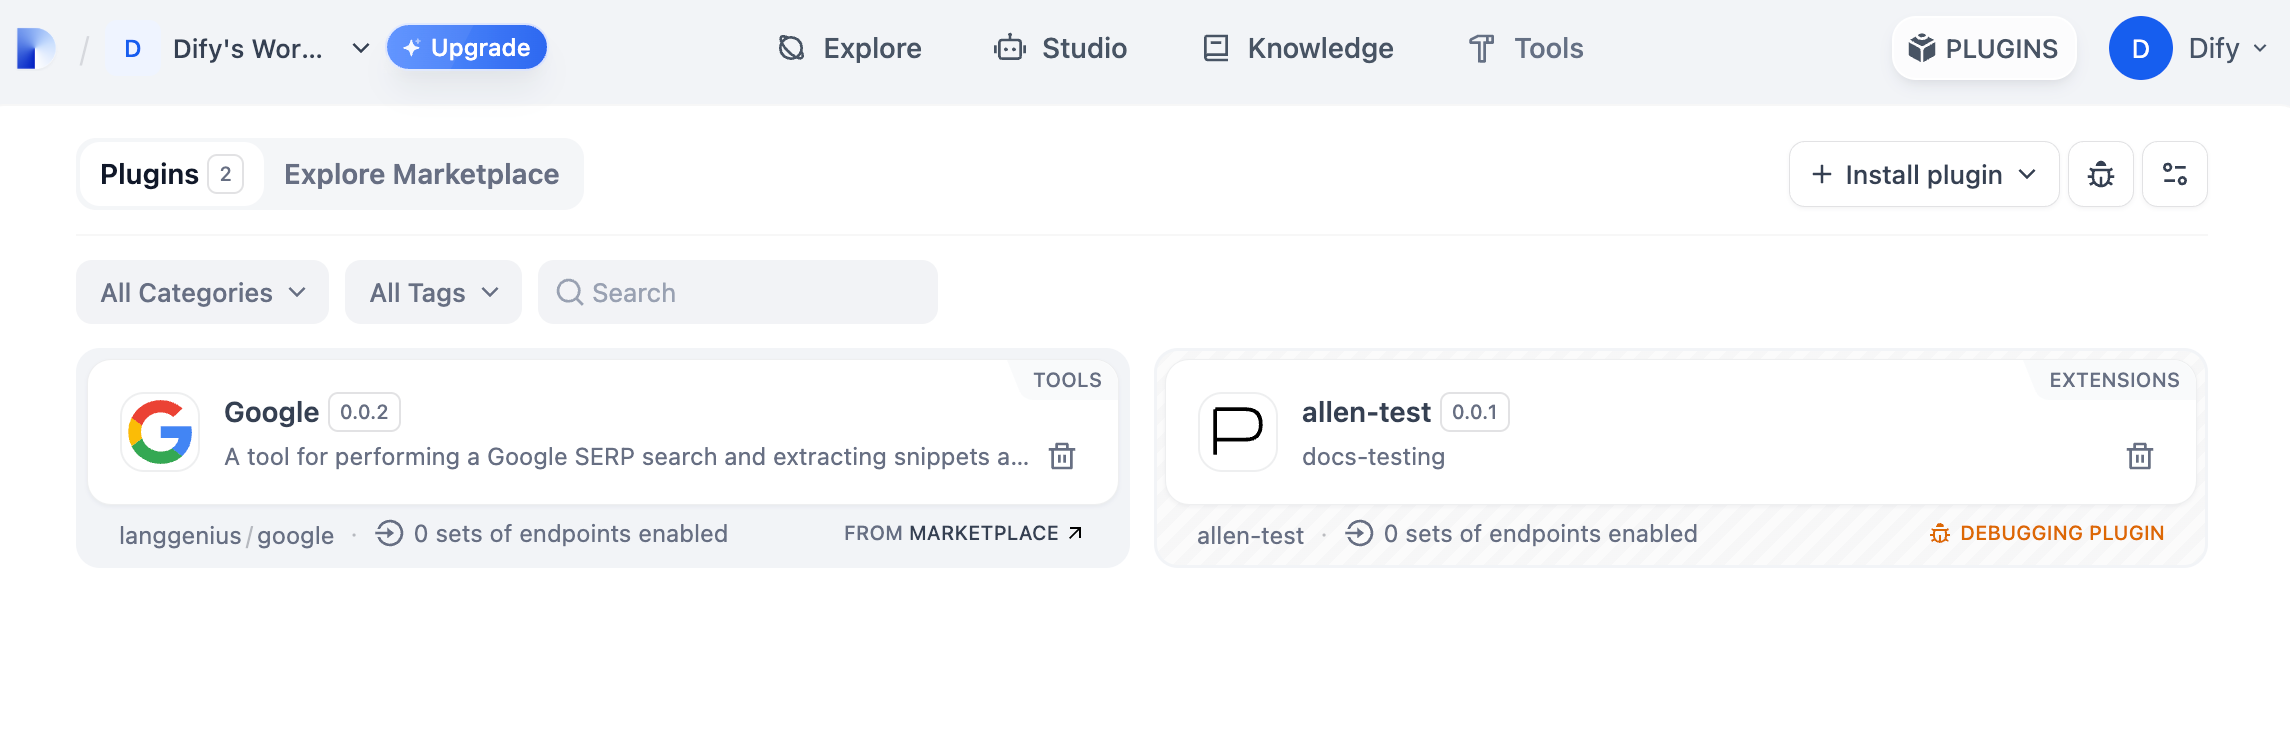
运行 `python -m main` 命令启动插件。在插件页即可看到该插件已被安装至 Workspace 内。其他团队成员也可以访问该插件。
|
|
|
|
|
|
|
|
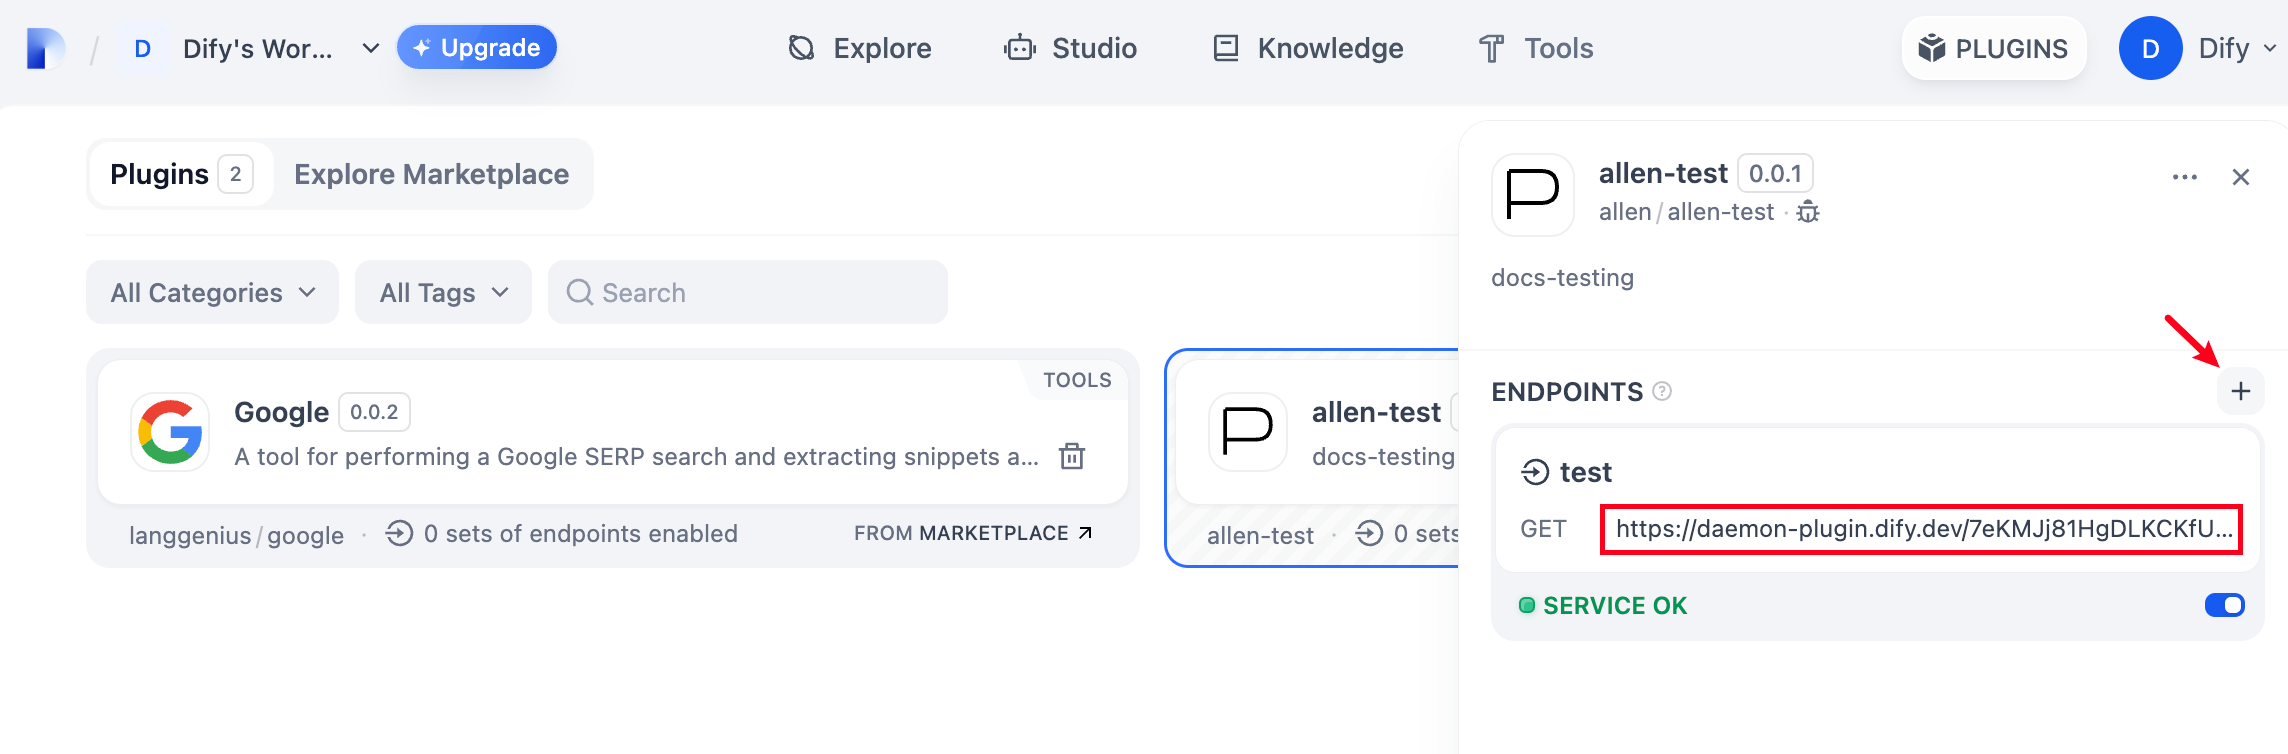
在插件内新增 Endpoint,随意填写名称和 `api_key` 等信息。访问自动生成的 URL,即可看到由插件提供的网页服务。
|
|
|
|
|
|
|
|
### 打包插件
|
|
|
|
确认插件能够正常运行后,可以通过以下命令行工具打包并命名插件。运行以后你可以在当前文件夹发现 `neko.difypkg` 文件,该文件为最终的插件包。
|
|
|
|
```bash
|
|
dify plugin package ./neko
|
|
```
|
|
|
|
恭喜,你已完成一个插件的完整开发、测试打包过程!
|
|
|
|
### 发布插件
|
|
|
|
现在可以将它上传至 [Dify Plugins 代码仓库](https://github.com/langgenius/dify-plugins) 来发布你的插件了!上传前,请确保你的插件遵循了[插件发布规范](https://docs.dify.ai/zh-hans/plugins/publish-plugins/publish-to-dify-marketplace)。审核通过后,代码将合并至主分支并自动上线至 [Dify Marketplace](https://marketplace.dify.ai/)。
|
|
|
|
### 探索更多
|
|
|
|
**快速开始:**
|
|
|
|
* [Tool 插件:Google Search](tool-plugin.md)
|
|
* [Model 插件](model-plugin/)
|
|
* [Bundle 插件:将多个插件打包](bundle.md)
|
|
|
|
**插件接口文档:**
|
|
|
|
* [Manifest](../../schema-definition/manifest.md) 结构
|
|
* [Endpoint](../../schema-definition/endpoint.md) 详细定义
|
|
* [反向调用 Dify 能力](../../schema-definition/reverse-invocation-of-the-dify-service/)
|
|
* [工具](../../schema-definition/tool.md)
|
|
* [模型](../../schema-definition/model/)
|
|
* [扩展 Agent 策略](../../schema-definition/agent.md)
|
|
|
|
**最佳实践:**
|
|
|
|
[开发 Slack Bot 插件](../../best-practice/develop-a-slack-bot-plugin.md)
|
|
|
|
{/*
|
|
Contributing Section
|
|
DO NOT edit this section!
|
|
It will be automatically generated by the script.
|
|
*/}
|
|
|
|
---
|
|
|
|
[このページを編集する](https://github.com/langgenius/dify-docs/edit/main/plugin-dev-ja/9231-extension-plugin.mdx) | [問題を報告する](https://github.com/langgenius/dify-docs/issues/new?template=docs.yml)
|
|
|