mirror of
https://github.com/BillyOutlast/posthog.com.git
synced 2026-02-11 14:50:57 +01:00
* Add posthog-js defaults to snippet examples

* Add defaults to install-web too

* Add some more defaults

* feat: Add `<ph_posthog_js_defaults>` everywhere

Everywhere where we're initializing `<ph_project_api_key>` now also initializes `<ph_posthog_js_defaults>`. A follow-up pass is needed to update `pageview` docs letting people know we're tracking these automatically now

* refactor(): Remove `ph_posthog_js_defaults` where we're not initing lib from beggining

We'll only include the `defaults` suggestion in places where we're explaining HOW we initialize posthog. When we're talking about a non-correlated config, then we'll omit it. The same applies to `api_host`

* refactor: Stop using `history_change` in most places

Rather than suggesting `history_change`, let's instead suggest using our new `defaults` feature

* add a space

* change next.js note

* Ian's fixes

---------

Co-authored-by: Rafa Audibert <rafael@posthog.com>
Co-authored-by: Ian Vanagas <34755028+ivanagas@users.noreply.github.com>
286 lines
11 KiB
Markdown
286 lines
11 KiB
Markdown
---
|
||
title: How to set up feature flags in Flutter
|
||
date: 2024-03-05
|
||
author:
|
||
- lior-neu-ner
|
||
tags:
|
||
- feature flags
|
||
---
|
||
|
||
import { ProductScreenshot } from 'components/ProductScreenshot'
|
||
export const EventsInPostHogLight = "https://res.cloudinary.com/dmukukwp6/image/upload/posthog.com/contents/images/tutorials/flutter-feature-flags/events-light.png"
|
||
export const EventsInPostHogDark = "https://res.cloudinary.com/dmukukwp6/image/upload/posthog.com/contents/images/tutorials/flutter-feature-flags/events-dark.png"
|
||
export const CreateFlagLight = "https://res.cloudinary.com/dmukukwp6/image/upload/posthog.com/contents/images/tutorials/flutter-feature-flags/create-flag-light.png"
|
||
export const CreateFlagDark = "https://res.cloudinary.com/dmukukwp6/image/upload/posthog.com/contents/images/tutorials/flutter-feature-flags/create-flag-dark.png"
|
||
|
||
[Feature flags](/feature-flags) help you conditionally roll out and release features safely. This tutorial shows you how integrate them into your Flutter app using PostHog.
|
||
|
||
We'll create a basic Flutter app, add PostHog, create a feature flag, and then implement the flag to control content in our app.
|
||
|
||
## 1. Create a new Flutter app
|
||
|
||
Our app will have two screens:
|
||
|
||
1. The first screen will have a button which takes you to a second screen.
|
||
2. The second screen will either have a `red` or `green` background color, depending on whether our feature flag is enabled or not.
|
||
|
||
To set this up, first ensure the [Flutter extension for VS Code](https://marketplace.visualstudio.com/items?itemName=Dart-Code.flutter) is installed. Then, create a new app by opening the Command Palette in VS Code (`Ctrl/Cmd + Shift + P`), typing `flutter` and selecting `Flutter: New Project`.
|
||
|
||
Select `Empty Application` and name your app `flutter_feature_flags`. Then, replace your code in `lib/main.dart` with the following:
|
||
|
||
```dart file=lib/main.dart
|
||
import 'package:flutter/material.dart';
|
||
import 'feature_screen_view.dart';
|
||
|
||
void main() {
|
||
runApp(const MyApp());
|
||
}
|
||
|
||
class MyApp extends StatelessWidget {
|
||
const MyApp({super.key});
|
||
@override
|
||
Widget build(BuildContext context) {
|
||
return const MaterialApp(
|
||
title: 'Flutter Feature Flags App',
|
||
home: MainScreen(),
|
||
);
|
||
}
|
||
}
|
||
|
||
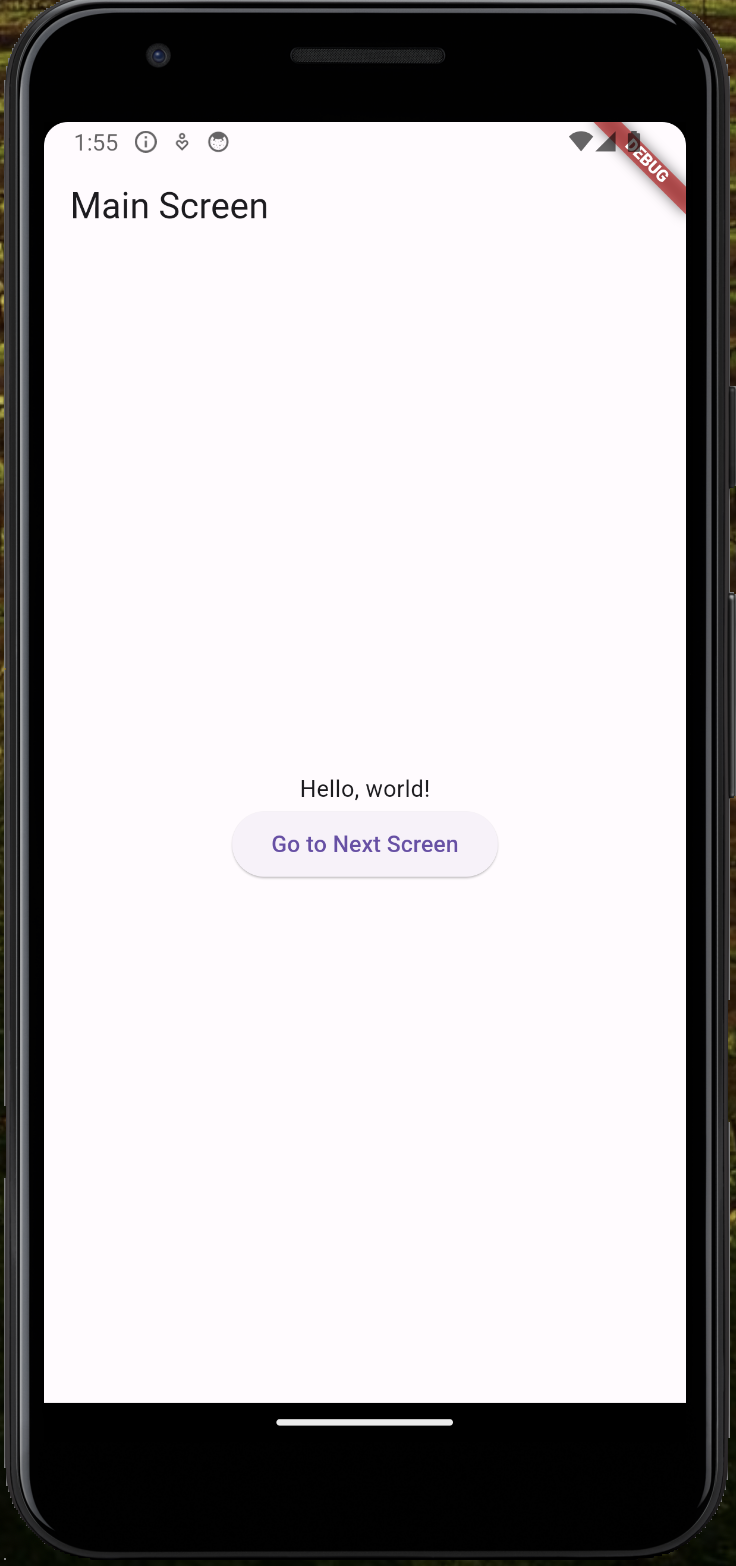
class MainScreen extends StatelessWidget {
|
||
const MainScreen({super.key});
|
||
@override
|
||
Widget build(BuildContext context) {
|
||
return Scaffold(
|
||
appBar: AppBar(title: const Text('Main Screen')),
|
||
body: Center(
|
||
child: Column(
|
||
mainAxisAlignment: MainAxisAlignment.center,
|
||
children: <Widget>[
|
||
const Text('Hello, world!'),
|
||
ElevatedButton(
|
||
child: const Text('Go to Next Screen'),
|
||
onPressed: () {
|
||
Navigator.push(
|
||
context,
|
||
MaterialPageRoute(builder: (context) => const FeatureScreenView(isFlagEnabled: false)), // We update this later
|
||
);
|
||
},
|
||
),
|
||
],
|
||
),
|
||
),
|
||
);
|
||
}
|
||
}
|
||
```
|
||
|
||
Lastly, in the `lib` directory, create a new file for our second screen called `feature_screen_view.dart`. Add the following code to it:
|
||
|
||
```dart
|
||
import 'package:flutter/material.dart';
|
||
|
||
class FeatureScreenView extends StatelessWidget {
|
||
final bool isFlagEnabled;
|
||
|
||
const FeatureScreenView({Key? key, required this.isFlagEnabled}) : super(key: key);
|
||
|
||
@override
|
||
Widget build(BuildContext context) {
|
||
return Scaffold(
|
||
backgroundColor: isFlagEnabled ? Colors.green : Colors.red,
|
||
);
|
||
}
|
||
}
|
||
```
|
||
|
||
Press **F5** and run the app in any emulator (we chose Android) to see your app in action.
|
||
|
||
|
||
|
||
## 2. Add PostHog to your app
|
||
|
||
With our app set up, it’s time to install and set up PostHog. If you don't have a PostHog instance, you can [sign up for free](https://us.posthog.com/signup).
|
||
|
||
To start, install [PostHog’s Flutter SDK](/docs/libraries/flutter) by adding `posthog_flutter` to your `pubspec.yaml`:
|
||
|
||
```yaml file=pubspec.yaml
|
||
# rest of your code
|
||
|
||
dependencies:
|
||
flutter:
|
||
sdk: flutter
|
||
posthog_flutter: ^4.0.1
|
||
|
||
# rest of your code
|
||
```
|
||
|
||
Next, we configure PostHog in each platform using our project API key and instance address. You can find these in [your project settings](https://us.posthog.com/settings/project).
|
||
|
||
### Android setup
|
||
|
||
For Android, add your PostHog configuration to your `AndroidManifest.xml` file located in the `android/app/src/main`:
|
||
|
||
```xml file=android/app/src/main/AndroidManifest.xml
|
||
<manifest xmlns:android="http://schemas.android.com/apk/res/android" package="your.package.name">
|
||
<application>
|
||
<!-- ... other configuration ... -->
|
||
<meta-data android:name="com.posthog.posthog.API_KEY" android:value="<ph_project_api_key>" />
|
||
<meta-data android:name="com.posthog.posthog.POSTHOG_HOST" android:value="<ph_client_api_host>" /> <!-- usually 'https://us.i.posthog.com' or 'https://eu.i.posthog.com' -->
|
||
<meta-data android:name="com.posthog.posthog.TRACK_APPLICATION_LIFECYCLE_EVENTS" android:value="true" />
|
||
<meta-data android:name="com.posthog.posthog.DEBUG" android:value="true" />
|
||
</application>
|
||
</manifest>
|
||
```
|
||
|
||
You'll also need to update the minimum Android SDK version to `21` in `android/app/build.gradle`:
|
||
|
||
```gradle_kotlin file=android/app/build.gradle
|
||
// rest of your config
|
||
|
||
defaultConfig {
|
||
minSdkVersion 21
|
||
// rest of your config
|
||
}
|
||
|
||
// rest of your config
|
||
```
|
||
|
||
### iOS setup
|
||
|
||
For iOS, you need to have [Cocoapods](https://guides.cocoapods.org/using/getting-started.html) installed. Then add your PostHog configuration to the `Info.plist` file located in the `ios/Runner` directory:
|
||
|
||
```xml file=ios/Runner/Info.plist
|
||
<?xml version="1.0" encoding="UTF-8"?>
|
||
<!DOCTYPE plist PUBLIC "-//Apple//DTD PLIST 1.0//EN" "http://www.apple.com/DTDs/PropertyList-1.0.dtd">
|
||
<plist version="1.0">
|
||
<dict>
|
||
<!-- rest of your configuration -->
|
||
<key>com.posthog.posthog.API_KEY</key>
|
||
<string><ph_project_api_key></string>
|
||
<key>com.posthog.posthog.POSTHOG_HOST</key>
|
||
<string><ph_client_api_host></string> <!-- https://us.i.posthog.com or https://eu.i.posthog.com -->
|
||
<key>com.posthog.posthog.CAPTURE_APPLICATION_LIFECYCLE_EVENTS</key>
|
||
<true/>
|
||
<key>com.posthog.posthog.DEBUG</key>
|
||
<true/>
|
||
</dict>
|
||
</plist>
|
||
```
|
||
|
||
Then you need to set the minimum platform version to iOS 13.0 in your Podfile:
|
||
|
||
```yaml file=ios/Podfile
|
||
platform :ios, '13.0'
|
||
|
||
# rest of your config
|
||
```
|
||
|
||
### Web setup
|
||
|
||
For Web, add your `Web snippet` (which you can find in [your project settings](https://us.posthog.com/settings/project#snippet)) in the `<head>` of your `web/index.html` file:
|
||
|
||
```html file=web/index.html
|
||
<!DOCTYPE html>
|
||
<html>
|
||
|
||
<head>
|
||
<!-- ... other head elements ... -->
|
||
|
||
<script>
|
||
!function(t,e){var o,n,p,r;e.__SV||(window.posthog=e,e._i=[],e.init=function(i,s,a){function g(t,e){var o=e.split(".");2==o.length&&(t=t[o[0]],e=o[1]),t[e]=function(){t.push([e].concat(Array.prototype.slice.call(arguments,0)))}}(p=t.createElement("script")).type="text/javascript",p.crossOrigin="anonymous",p.async=!0,p.src=s.api_host+"/static/array.js",(r=t.getElementsByTagName("script")[0]).parentNode.insertBefore(p,r);var u=e;for(void 0!==a?u=e[a]=[]:a="posthog",u.people=u.people||[],u.toString=function(t){var e="posthog";return"posthog"!==a&&(e+="."+a),t||(e+=" (stub)"),e},u.people.toString=function(){return u.toString(1)+".people (stub)"},o="capture identify alias people.set people.set_once set_config register register_once unregister opt_out_capturing has_opted_out_capturing opt_in_capturing reset isFeatureEnabled onFeatureFlags getFeatureFlag getFeatureFlagPayload reloadFeatureFlags group updateEarlyAccessFeatureEnrollment getEarlyAccessFeatures getActiveMatchingSurveys getSurveys getNextSurveyStep onSessionId".split(" "),n=0;n<o.length;n++)g(u,o[n]);e._i.push([i,s,a])},e.__SV=1)}(document,window.posthog||[]);
|
||
posthog.init('<ph_project_api_key>', {
|
||
api_host:'<ph_client_api_host>',
|
||
defaults: '<ph_posthog_js_defaults>'
|
||
})
|
||
</script>
|
||
</head>
|
||
|
||
<!-- ... other elements ... -->
|
||
|
||
</html>
|
||
```
|
||
|
||
## 3. Create a feature flag in PostHog
|
||
|
||
With PostHog set up, your app is ready for feature flags. To create one, go to the [feature flags tab](https://us.posthog.com/feature_flags) in PostHog and click **New feature flag**. Enter a flag key (like `my-cool-flag`), set the release condition to roll out to 100% of users, and press "Save."
|
||
|
||
<ProductScreenshot
|
||
imageLight={CreateFlagLight}
|
||
imageDark={CreateFlagDark}
|
||
alt="Feature flag created in PostHog"
|
||
classes="rounded"
|
||
/>
|
||
|
||
You can customize your [release conditions](/docs/feature-flags/creating-feature-flags#release-conditions) with rollout percentages, and [user](/docs/product-analytics/person-properties) or [group properties](/docs/product-analytics/group-analytics) to fit your needs.
|
||
|
||
## 4. Implement the flag code
|
||
|
||
To implement the feature flag, we:
|
||
|
||
1. Fetch the `my-cool-flag` flag using [`await Posthog().isFeatureEnabled('my-cool-flag')`](/docs/libraries/flutter#feature-flags).
|
||
2. Change the background color of `FeatureScreenView` based on the value of the flag.
|
||
|
||
To do this, update the code in `main.dart` to the following:
|
||
|
||
```dart filename=main.dart
|
||
import 'package:flutter/material.dart';
|
||
import 'feature_screen_view.dart';
|
||
import 'package:posthog_flutter/posthog_flutter.dart';
|
||
|
||
void main() {
|
||
runApp(const MyApp());
|
||
}
|
||
|
||
class MyApp extends StatelessWidget {
|
||
const MyApp({super.key});
|
||
@override
|
||
Widget build(BuildContext context) {
|
||
return const MaterialApp(
|
||
title: 'Flutter Feature Flags App',
|
||
home: MainScreen(),
|
||
);
|
||
}
|
||
}
|
||
|
||
class MainScreen extends StatelessWidget {
|
||
const MainScreen({super.key});
|
||
|
||
@override
|
||
Widget build(BuildContext context) {
|
||
return Scaffold(
|
||
appBar: AppBar(title: const Text('Main Screen')),
|
||
body: Center(
|
||
child: Column(
|
||
mainAxisAlignment: MainAxisAlignment.center,
|
||
children: <Widget>[
|
||
const Text('Hello, world!'),
|
||
ElevatedButton(
|
||
child: const Text('Go to Next Screen'),
|
||
onPressed: () async {
|
||
bool isFlagEnabled = await Posthog().isFeatureEnabled('my-cool-flag');
|
||
if (context.mounted) {
|
||
Navigator.push(
|
||
context,
|
||
MaterialPageRoute(builder: (context) => FeatureScreenView(isFlagEnabled: isFlagEnabled)),
|
||
);
|
||
}
|
||
}
|
||
),
|
||
],
|
||
),
|
||
),
|
||
);
|
||
}
|
||
}
|
||
```
|
||
|
||
That's it! When you restart your app and click the button, you should see the green background color on the second screen.
|
||
|
||
## Further reading
|
||
|
||
- [A software engineer's guide to A/B testing](/product-engineers/ab-testing-guide-for-engineers)
|
||
- [How to run A/B tests in Flutter](/tutorials/flutter-ab-tests)
|
||
- [How to set up analytics in Flutter](/tutorials/flutter-analytics)
|
||
- [How to set up remote config in Flutter](/tutorials/flutter-remote-config)
|
||
<NewsletterForm /> |