8.2 KiB
title, sidebar, showTitle, author, date, tags
| title | sidebar | showTitle | author | date | tags | |||
|---|---|---|---|---|---|---|---|---|
| Running experiments on new users | Docs | true |
|
2022-10-10 |
|
- Level: Medium 🦔🦔
- Estimated reading time: 10 minutes ☕️☕️
Optimizing the initial experience of new users is critical for turning them into existing users. Products have a limited amount of time and attention from new users before they leave and churn.
One way PostHog helps create better new user experiences is through experiments. Experiments help teams test changes and their effect on key metrics to create better products.
Experiments start with a proposed change and hypothesized impact. They then guide you through setting up the user groups and feature flags for testing. Finally, they provide analysis of results.
We’ll use all this to help us create a better new user experience.
Our experiment and what we need
In our example project, we have a Dropbox-like product that allows users to upload and download files. For our experiment, we want to see if a change to our onboarding process gets more new users to complete the first key event in our product, uploading a file. We have design and copy changes we’d to try to encourage new users to upload a file.
We’ve already set up PostHog (on a paid plan, to get access to experiments), and have custom events set up for both signed_up and uploaded_file. Both have a significant amount of events coming in.
We’ll also need a joined_at person property. Autocapture does not capture this detail so we’ll need to set it up somewhere in our code. Make sure you are capturing identified events and then use $set_once in the event capture for signed_up to make this happen (find more details on setting person properties here).
This is all we need to start setting up our experiment.
Setting up our experiment in PostHog
To start setting up our experiment, go to the Experiments tab, and start entering basic info like a name, key, and description. We are going to test two design and copy changes so we’ll create variant keys for both. One is named upload-prompt, and the other is upload-instructions.

For our participants, we will choose users, and then use regex to filter for ones who joined recently. We’ll use the regex equation 2022-09.+ to filter all the users who joined in September (because that was last month).
Note: You can change
2022or09to whatever years or months you want. You could also add a specific day (2022-09-18.+) or a range of days (2022-09-1([1-8]).+). There is a lot you can do with regex basically, we are only scratching the surface here.

We could also choose organizations or other groups here (if they are set up). This would allow us to provide a consistent experience to every member of an organization and see how their usage differed at an organizational level. To learn more about group analytics, see our product manual.
Next, for goal type, we’ll choose funnel. We want the number of new users uploading files (getting further in the funnel) to increase significantly.
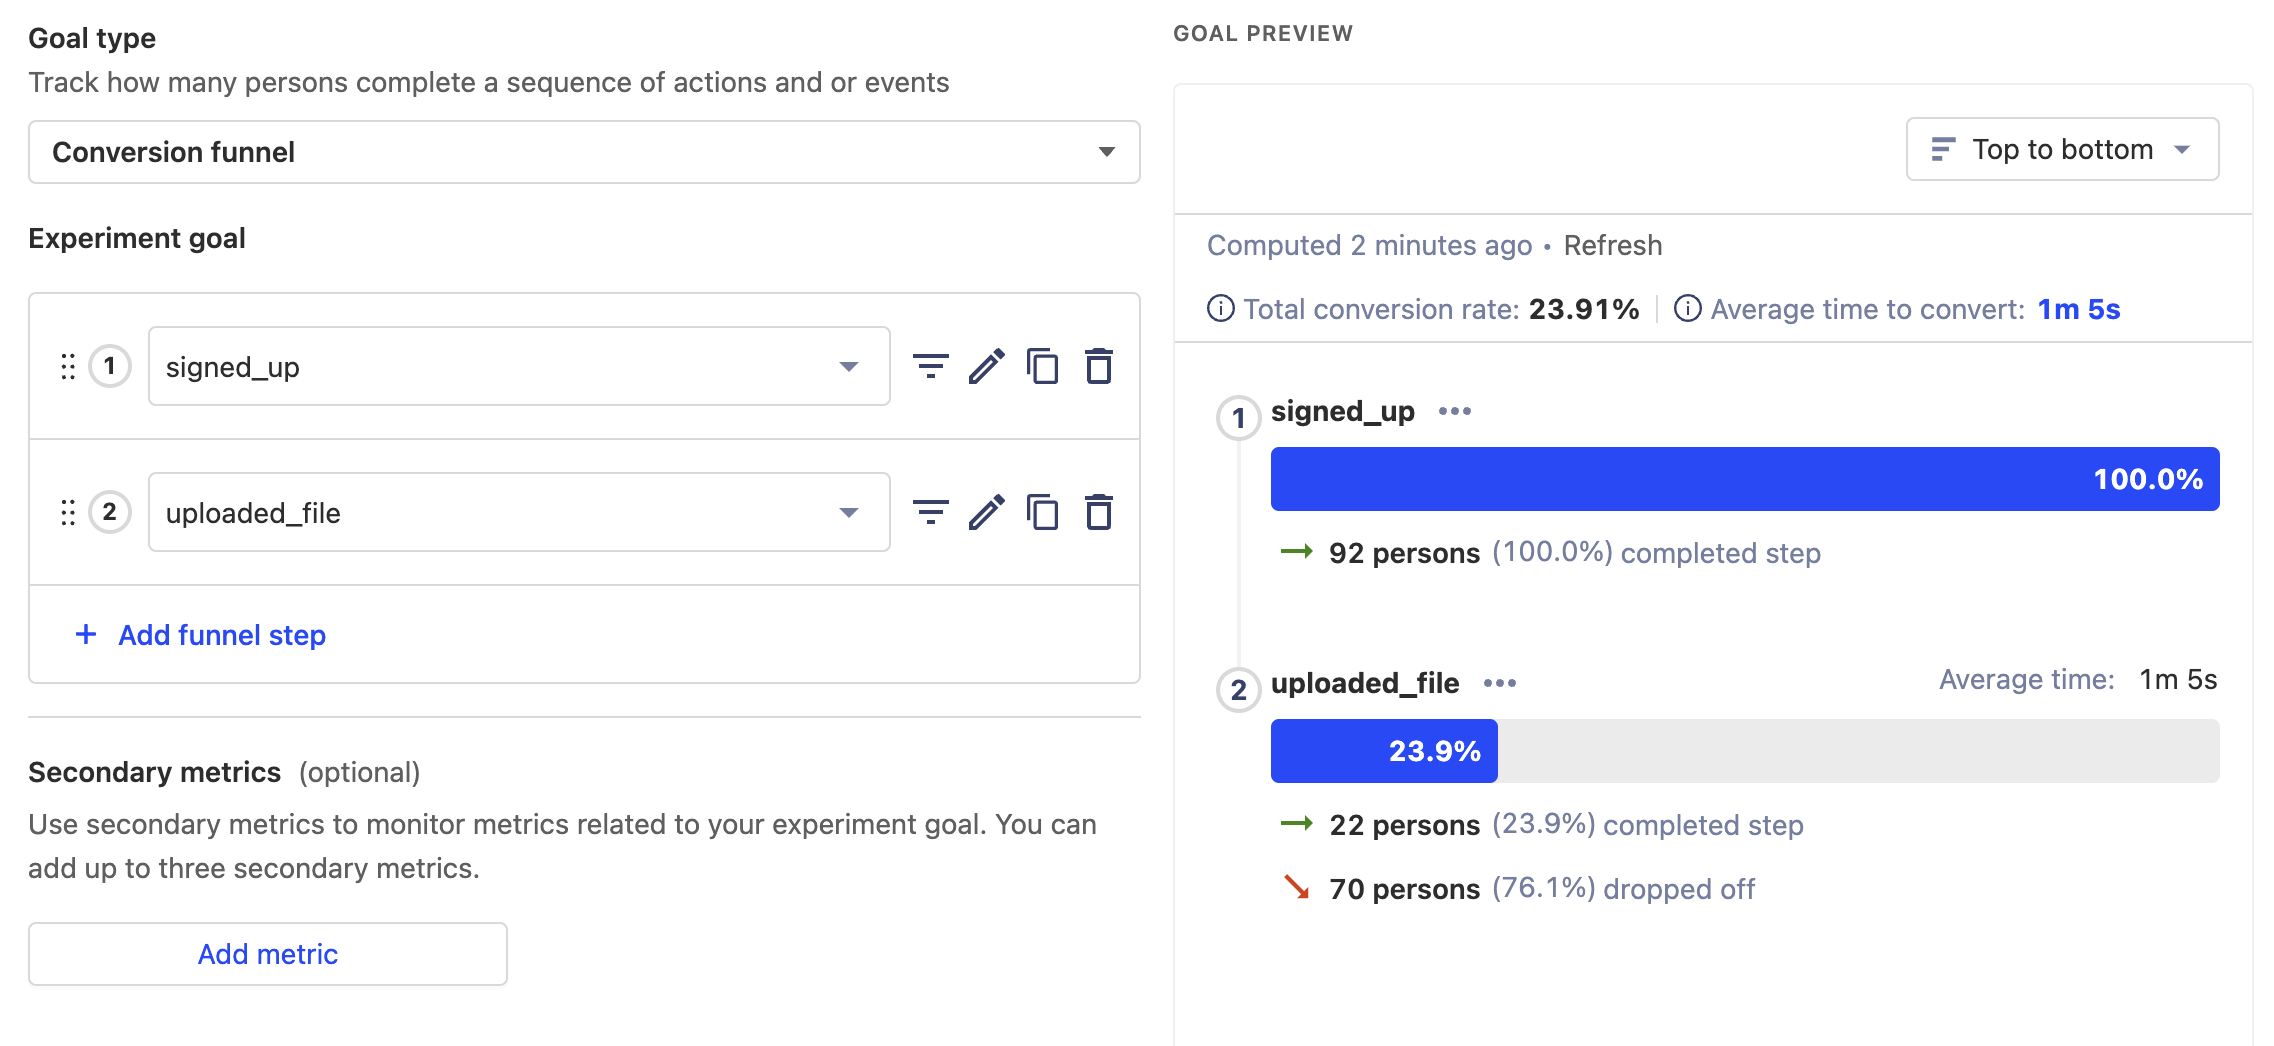
Finally, we’ll set the minimum acceptable improvement to 20%. This is a lot, but (hypothetically) we have a lot of room to improve here. This means that out of all the new users who sign up, we want to raise the percentage who upload a file to go from 23.9% to 43.9%. PostHog calculated (and recommends) a sample size of 219 and a recommended running time of 33 days. This is long, but it’s required because we have a small number of new users coming in.
Implementing our experiment
We’ll add our new experiment feature flags to our codebase on a page with the file upload many new users see. We’ll need to create the two changes and add them behind feature flags.
It’s best practice to ensure we fall back on the standard component. The standard component is the "control" (default) for the experiment. We want to only make changes if the feature flags are active and working.
Here’s what a standard React component looks like before implementing feature flags:
// Upload.js
import "./Upload.css";

function Upload() {
  const handleFileInput = (e) => {
    const file = e.target.files[0];
    const reader = new FileReader();
    reader.onload = (e) => {
      posthog.capture('uploaded_file', {
        file_type: file.type
      });
    };
    // More file handling code here...
  };

  return (
    <div>
      <h2>Upload</h2>
      <form>
        <label className="upload-label">
          Choose your file
        </label>
        <div className="upload-input">
          <input
            type="file"
            onChange={handleFileInput}
          />
        </div>
      </form>
    </div>
  );
}

export default Upload;
Here’s what it looks like when we add our experimental feature flags:
// Upload.js
import "./Upload.css";
import posthog from 'posthog-js'

function Upload() {
  const handleFileInput = (e) => {
    const file = e.target.files[0];
    const reader = new FileReader();
    reader.onload = (e) => {
      posthog.capture('uploaded_file', {
        file_type: file.type
      });
    };
    // More file handling code here...
  };

  if (posthog.getFeatureFlag('new-user-files') === 'upload-prompt') {
    return (
      <div className="upload-test">
        <h2>Upload</h2>
        <form>
          <label className="upload-label-test">
            Choose your file
          </label>
          <div className="upload-input">
            <input
              type="file"
              onChange={handleFileInput}
            />
          </div>
        </form>
      </div>
    );
  }

  if (posthog.getFeatureFlag('new-user-files') === 'upload-instructions') {
    return (
      <div>
        <h2>Upload a File</h2>
        <form>
          <label className="upload-label">
            Get started with the creation process
          </label>
          <div className="upload-input">
            <input
              type="file"
              onChange={handleFileInput}
            />
          </div>
        </form>
      </div>
    );
  }

  return (
    <div>
      <h2>Upload</h2>
      <form>
        <label className="upload-label">
          Choose your file
        </label>
        <div className="upload-input">
          <input
            type="file"
            onChange={handleFileInput}
          />
        </div>
      </form>
    </div>
  );
}

export default Upload;
Note: we’ve made sure we default to the unchanged, standard component. We only use the new, test components if the feature flags work. This is important in case of requests failing or other unforeseen problems.
Launching our experiment
Once we’ve made these changes, the next steps are to:
- launch the experiment in PostHog
- ensure the flags are working locally with our toolbar
- merge changes (behind feature flags) in production
- start to gather results from real, new users
For the length of your experiment, PostHog automatically analyzes the usage of our feature flags and events. At the end of the experiment, we’ll hopefully get insights that our changes improved our key metric (the signed_up to uploaded_file funnel) with new users. With positive results, we can roll out the feature to everyone.
Once results start to show up in PostHog, we can say we’ve successfully set up and implemented experiments on new users.
Further reading
If you’re looking to learn more about feature flags, check out our product manual to learn all about their features.
You can also learn about how to run Experiments without feature flags in this tutorial.