mirror of
https://github.com/BillyOutlast/posthog.com.git
synced 2026-02-05 11:51:21 +01:00
* Add posthog-js defaults to snippet examples

* Add defaults to install-web too

* Add some more defaults

* feat: Add `<ph_posthog_js_defaults>` everywhere

Everywhere where we're initializing `<ph_project_api_key>` now also initializes `<ph_posthog_js_defaults>`. A follow-up pass is needed to update `pageview` docs letting people know we're tracking these automatically now

* refactor(): Remove `ph_posthog_js_defaults` where we're not initing lib from beggining

We'll only include the `defaults` suggestion in places where we're explaining HOW we initialize posthog. When we're talking about a non-correlated config, then we'll omit it. The same applies to `api_host`

* refactor: Stop using `history_change` in most places

Rather than suggesting `history_change`, let's instead suggest using our new `defaults` feature

* add a space

* change next.js note

* Ian's fixes

---------

Co-authored-by: Rafa Audibert <rafael@posthog.com>
Co-authored-by: Ian Vanagas <34755028+ivanagas@users.noreply.github.com>
242 lines
8.3 KiB
Markdown
242 lines
8.3 KiB
Markdown
---
|
||
title: 'How to set up Angular analytics, feature flags, and more'
|
||
date: 2023-10-17
|
||
author:
|
||
- ian-vanagas
|
||
showTitle: true
|
||
sidebar: Docs
|
||
featuredImage: >-
|
||
https://res.cloudinary.com/dmukukwp6/image/upload/posthog.com/contents/images/tutorials/banners/tutorial-14.png
|
||
tags:
|
||
- configuration
|
||
- feature flags
|
||
- events
|
||
---
|
||
|
||
Angular is one of the original JavaScript web app frameworks and remains a popular choice for building them. To make your Angular app as good as possible, you need tools like [analytics](/docs/product-analytics), [session replay](/docs/session-replay), and [feature flags](/docs/feature-flags). PostHog provides these tools and is easy to set up in Angular.
|
||
|
||
This tutorial shows you how to set up the tools PostHog provides by creating a basic Angular app, adding PostHog, and then using it to capture events and manage feature flags.
|
||
|
||
> **Note:** This tutorial uses Angular v16. To learn how to set up PostHog for v18, see our [Angular docs](/docs/libraries/angular).
|
||
|
||
## Creating our Angular app
|
||
|
||
Angular has a powerful CLI we rely on for this tutorial. Install it by running `npm install -g @angular/cli` in your terminal.
|
||
|
||
Once installed, create a new Angular app (with routing) and go into its folder.
|
||
|
||
```bash
|
||
npx -p @angular/cli@16 ng new angular-ph --routing
|
||
cd angular-ph
|
||
```
|
||
|
||
### Adding pages
|
||
|
||
To show the basics of PostHog, we create a simple app—just two pages and a link to move between them.
|
||
|
||
To start with creating this app, first, generate `home` and `about` components using the Angular CLI.
|
||
|
||
```bash
|
||
ng generate component home
|
||
ng generate component about
|
||
```
|
||
|
||
This creates new folders in `src/app` for each of them. Next, set up both these pages with a title and a link. First, edit `src/app/home/home.component.html` for the home page component:
|
||
|
||
```html
|
||
<h1>Home</h1>
|
||
<a routerLink="/about" routerLinkActive="active" ariaCurrentWhenActive="page">Go to About</a>
|
||
```
|
||
|
||
Next, edit `src/app/about/about.component.html` for the about page component:
|
||
|
||
```html
|
||
<h1>About</h1>
|
||
<a routerLink="/" routerLinkActive="active" ariaCurrentWhenActive="page">Back Home</a>
|
||
```
|
||
|
||
In `src/app/app-routing.module.ts`, import and add these pages as routes:
|
||
|
||
```js
|
||
import { NgModule } from '@angular/core';
|
||
import { RouterModule, Routes } from '@angular/router';
|
||
import { HomeComponent } from './home/home.component';
|
||
import { AboutComponent } from './about/about.component';
|
||
|
||
const routes: Routes = [
|
||
{
|
||
path: '',
|
||
component: HomeComponent
|
||
},
|
||
{
|
||
path: 'about',
|
||
component: AboutComponent
|
||
}
|
||
];
|
||
|
||
@NgModule({
|
||
imports: [RouterModule.forRoot(routes)],
|
||
exports: [RouterModule]
|
||
})
|
||
export class AppRoutingModule { }
|
||
```
|
||
|
||
Remove the placeholder code from `app.component.html`, leaving us with only the router outlet.
|
||
|
||
```bash
|
||
<router-outlet></router-outlet>
|
||
```
|
||
|
||
Now, we can run `ng serve` in our terminal and go to [`http://localhost:4200/`](http://localhost:4200/) to see our basic app.
|
||
|
||

|
||
|
||
## Installing PostHog
|
||
|
||
With our app set up, it’s time to install and set up PostHog. To start, install the [JavaScript Web SDK](/docs/libraries/js):
|
||
|
||
```bash
|
||
npm i posthog-js
|
||
```
|
||
|
||
To preemptively fix a TypeScript compilation error, we need to install some `rrweb` types and then clear the `npm` cache.
|
||
|
||
```bash
|
||
npm install @rrweb/types@2.0.0-alpha.17 rrweb-snapshot@2.0.0-alpha.17
|
||
npm cache clean --force
|
||
```
|
||
|
||
Next, in `main.ts`, initialize PostHog using your project API key and instance address. You can get both in your [project settings](https://app.posthog.com/project/settings).
|
||
|
||
```js
|
||
import { platformBrowserDynamic } from '@angular/platform-browser-dynamic';
|
||
|
||
import { AppModule } from './app/app.module';
|
||
import posthog from 'posthog-js'
|
||
|
||
posthog.init('<ph_project_api_key>', {
|
||
api_host:'<ph_client_api_host>',
|
||
defaults: "<ph_posthog_js_defaults>",
|
||
})
|
||
|
||
platformBrowserDynamic().bootstrapModule(AppModule)
|
||
.catch(err => console.error(err));
|
||
```
|
||
|
||
Once set up, go back to your app, refresh, and PostHog begins autocapturing events. This includes button clicks, pageviews, pageleaves, and more. It also starts [recording sessions](/docs/session-replay) if you enable those in [your project settings](https://app.posthog.com/project/settings).
|
||
|
||
<ProductScreenshot
|
||
imageLight="https://res.cloudinary.com/dmukukwp6/image/upload/Clean_Shot_2025_05_22_at_13_15_47_2x_e281ec8779.png"
|
||
imageDark="https://res.cloudinary.com/dmukukwp6/image/upload/Clean_Shot_2025_05_22_at_13_15_19_2x_4dac32043a.png"
|
||
alt="Events in PostHog"
|
||
classes="rounded"
|
||
/>
|
||
|
||
## Capturing custom events
|
||
|
||
Beyond pageviews, there might be more events you want to capture. To do this, you can capture custom events with PostHog.
|
||
|
||
To showcase this, add a button to the home component that captures a `home_button_clicked` event in PostHog. To do this, go to your `home.component.html` and add the button with a click handler.
|
||
|
||
```html
|
||
<h1>Home</h1>
|
||
<button (click)="onClick()">Click me!</button>
|
||
<a routerLink="/about" routerLinkActive="active" ariaCurrentWhenActive="page">Go to About</a>
|
||
```
|
||
|
||
Afterwards, in `home.component.ts`, import PostHog and add the `onClick()` function with the `posthog.capture` call. Also, you can include a `button_name` property in the capture and use it for filtering later.
|
||
|
||
```js
|
||
import { Component } from '@angular/core';
|
||
import posthog from 'posthog-js'
|
||
|
||
@Component({
|
||
selector: 'app-home',
|
||
templateUrl: './home.component.html',
|
||
styleUrls: ['./home.component.css']
|
||
})
|
||
export class HomeComponent {
|
||
onClick() {
|
||
posthog.capture(
|
||
'home_button_clicked',
|
||
{ 'button_name': 'home' }
|
||
)
|
||
}
|
||
}
|
||
```
|
||
|
||
When users click this button, PostHog captures a custom `home_button_clicked` event.
|
||
|
||
## Setting up and using feature flags
|
||
|
||
PostHog enables you to use feature flags to control the release of features and code. We can use one to control the text on our button.
|
||
|
||
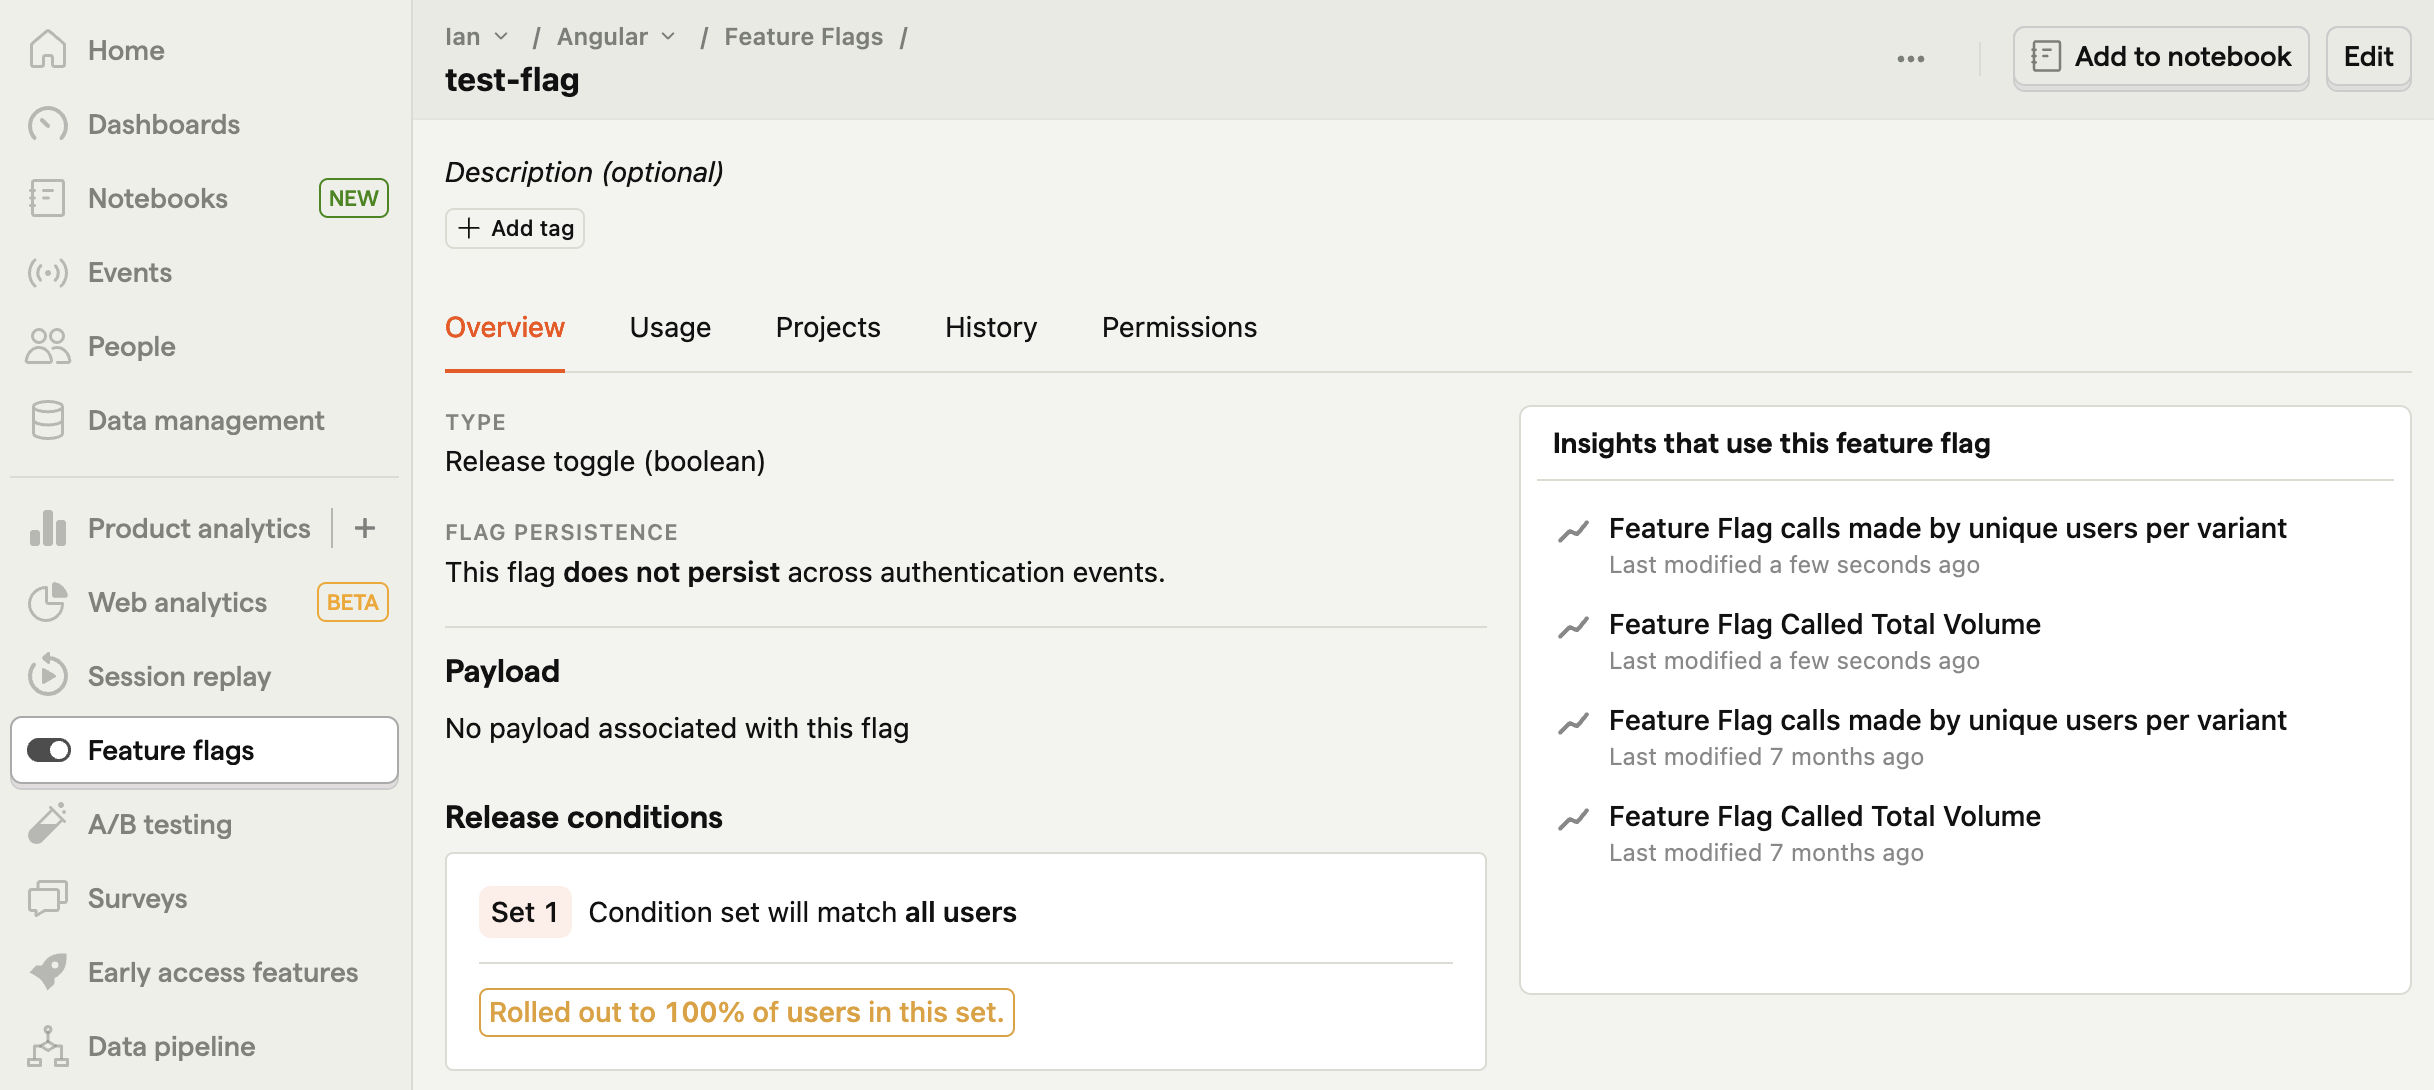
To start, go to the [feature flags tab](https://app.posthog.com/feature_flags) in PostHog and click "New feature flag." Name your key (like `test-flag`) and set the release conditions to 100% of users. Fill in any other details as you like, and then press "Save."
|
||
|
||
|
||
|
||
To implement the flag in our app, we must make the following changes the `home.component.ts` file:
|
||
|
||
- Set up a change detector service by importing `ChangeDetectorRef` and using a `constructor` to initialize it.
|
||
|
||
- Add a `buttonText` state variable in our `HomeComponent` class.
|
||
|
||
- Use the `ngOnInit()` lifecycle hook to wait for flags to load with `posthog.onFeatureFlags` then check our flag with `posthog.isFeatureEnabled('test-flag')`.
|
||
|
||
- Check the flag value, update the `buttonText` state, and use the `changeDetector` to update the template accordingly.
|
||
|
||
Altogether, this looks like this:
|
||
|
||
```js
|
||
import { Component, ChangeDetectorRef } from '@angular/core';
|
||
import posthog from 'posthog-js'
|
||
|
||
@Component({
|
||
selector: 'app-home',
|
||
templateUrl: './home.component.html',
|
||
styleUrls: ['./home.component.css']
|
||
})
|
||
export class HomeComponent {
|
||
constructor(private changeDetector: ChangeDetectorRef) {}
|
||
|
||
buttonText: string = 'Click me!';
|
||
|
||
ngOnInit() {
|
||
posthog.onFeatureFlags(() => {
|
||
if (posthog.isFeatureEnabled('test-flag')) {
|
||
this.buttonText = 'This page is great!';
|
||
this.changeDetector.detectChanges();
|
||
}
|
||
});
|
||
}
|
||
|
||
onClick() {
|
||
posthog.capture(
|
||
'home_button_clicked',
|
||
{ 'button_name': 'home' }
|
||
)
|
||
}
|
||
}
|
||
```
|
||
|
||
Lastly, update `home.component.html` to use the `buttonText` state variable.
|
||
|
||
```html
|
||
<h1>Home</h1>
|
||
<button (click)="onClick()">{{buttonText}}</button>
|
||
<a routerLink="/about" routerLinkActive="active" ariaCurrentWhenActive="page">Go to About</a>
|
||
```
|
||
|
||
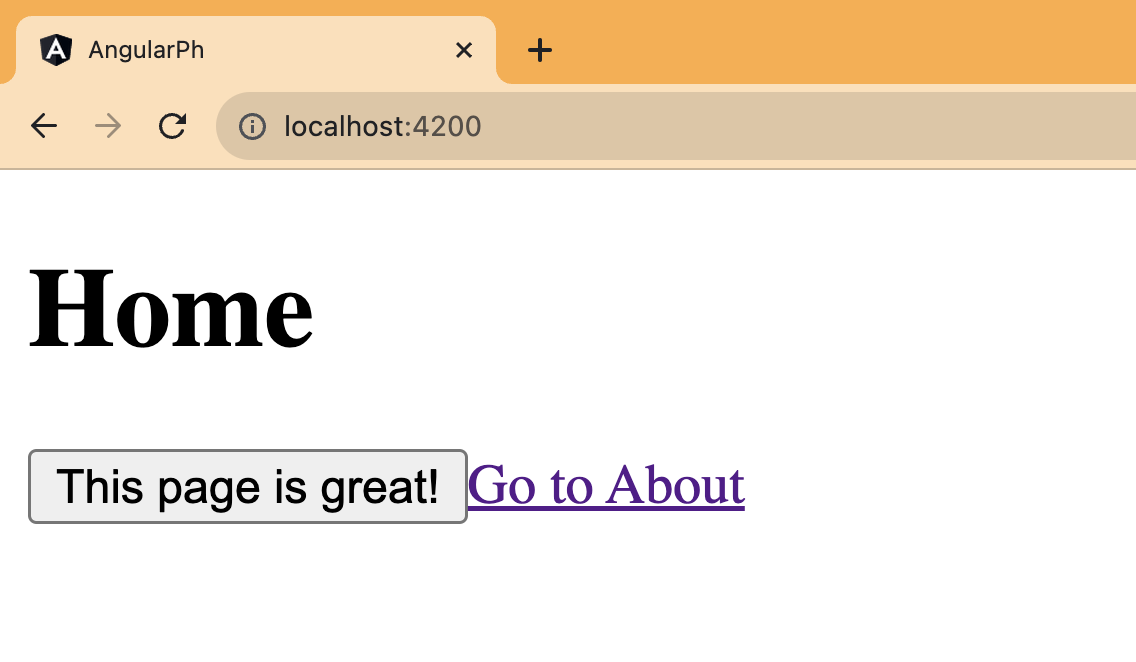
Now when you go to your app, a PostHog feature flag controls the button text.
|
||
|
||
|
||
|
||
> **Note:** If you want to remove the "flickering" of the button value on the first load, you can [bootstrap the flag values](/tutorials/bootstrap-feature-flags-react).
|
||
|
||
## Further reading
|
||
|
||
- [How to set up A/B tests in Angular](/tutorials/angular-ab-tests)
|
||
- [How to set up surveys in Angular](/tutorials/angular-surveys)
|
||
- [How to set up A/B/n testing](/tutorials/abn-testing)
|
||
|
||
<NewsletterForm /> |